
Aprilaire 4655 Manual Humidistat Wiring: A Comprehensive Guide
Navigating the installation of an Aprilaire 4655 humidistat with a 700M unit requires careful attention to wiring details‚ especially when replacing an existing unit.
Understanding the connections between the controller‚ solenoid valve (like the 4040 model)‚ and your furnace is crucial for successful operation and avoiding potential issues.
Understanding the Aprilaire 4655 Humidistat
The Aprilaire 4655 is a manual humidistat designed to control whole-house humidification systems‚ specifically when paired with units like the Aprilaire 700M. It functions as the central control‚ sensing the humidity levels within your home and signaling the humidifier to activate or deactivate to maintain the desired comfort level. Unlike digital models‚ the 4655 relies on a mechanical dial for humidity setting adjustments‚ offering a straightforward and reliable operation.
As a replacement unit‚ understanding its core function is vital. The humidistat doesn’t directly power the humidifier; instead‚ it acts as a switch‚ completing or breaking a circuit to the solenoid valve. This valve‚ often the Aprilaire 4040‚ then controls the water flow to the furnace where the humidification process occurs. Proper installation ensures accurate humidity control and efficient system performance‚ avoiding potential issues like over-humidification or insufficient moisture.
Compatibility with Aprilaire 700M Unit
The Aprilaire 4655 manual humidistat is specifically designed for seamless compatibility with the Aprilaire 700M whole-house humidifier. This pairing represents a common and reliable configuration for maintaining optimal indoor humidity levels. The 700M relies on the 4655 to accurately sense and respond to humidity needs‚ ensuring efficient operation and consistent comfort throughout your home.
When replacing an existing humidistat connected to a 700M‚ the 4655 offers a direct‚ drop-in replacement option‚ simplifying the installation process. However‚ it’s crucial to verify the wiring connections‚ even when following existing wiring‚ to ensure correct functionality. The 4655’s simple mechanical operation integrates effectively with the 700M’s water distribution system‚ providing a dependable solution for humidity control. Correct wiring is paramount for optimal performance.
Identifying Wiring Colors and Functions
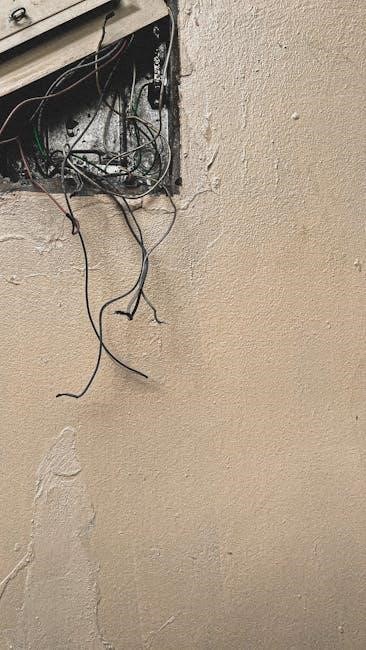
Understanding the wiring color codes is fundamental to a successful Aprilaire 4655 installation. Typically‚ the white wire serves as the primary connection‚ extending from the humidistat (Aprilaire 4655) to the solenoid valve (often an Aprilaire 4040 model) and ultimately to the furnace. This wire carries the signal to activate the humidifier. Other wire colors may be present depending on your specific system configuration‚ potentially including a common wire or wires for auxiliary functions.
It’s vital not to assume color consistency across all systems. Always double-check the wiring diagram specific to your Aprilaire 700M unit and 4655 humidistat. Incorrectly identifying wire functions can lead to malfunction or damage. Before disconnecting any wires‚ carefully label each one to avoid confusion during reassembly. A multimeter can be invaluable for verifying continuity and identifying live wires.
The Role of the Solenoid Valve (Aprilaire 4040)
The Aprilaire 4040 solenoid valve acts as a critical intermediary between the humidistat (4655) and your furnace‚ controlling the flow of water to the humidifier. The humidistat sends a signal via the white wire to energize the solenoid. When energized‚ the valve opens‚ allowing water to flow to the humidifier pad. When the desired humidity level is reached‚ the humidistat de-energizes the solenoid‚ closing the valve and stopping water flow.
Essentially‚ the solenoid is an electrically controlled switch for water; Proper function of the 4040 is essential for the entire system to operate correctly. A faulty solenoid can prevent the humidifier from activating‚ even if the humidistat is calling for humidity. Inspect the valve for any signs of corrosion or damage during installation and ensure secure connections to both the water supply and the furnace.
Basic Wiring Diagram Overview
A fundamental understanding of the wiring layout is paramount for a successful Aprilaire 4655 installation. The core connection revolves around the white wire‚ which originates at the humidistat (4655) and extends to the solenoid valve (typically an Aprilaire 4040). From the solenoid valve‚ the white wire continues onward to a designated terminal on your furnace – often labeled ‘humidifier’ or ‘H’.
This configuration establishes a circuit where the humidistat controls the solenoid‚ which in turn controls water flow to the furnace’s humidifier. While other wires might be present depending on your specific setup (like a red power wire)‚ the white wire represents the primary control signal. Always consult a detailed wiring diagram specific to your Aprilaire 700M unit and furnace model before beginning any wiring work.
White Wire Connection: Controller to Solenoid Valve to Furnace
The white wire is the lifeline of your Aprilaire 4655 humidistat system‚ dictating when the humidifier activates. It begins at the controller (4655)‚ transmitting the signal to the solenoid valve (4040). This valve acts as a gatekeeper‚ controlling the water supply to your furnace’s humidifier. Ensure a secure connection at both the controller and the solenoid valve terminals.
From the solenoid valve‚ the white wire proceeds directly to the furnace. Locate the designated humidifier terminal – often marked ‘H’ – and firmly connect the wire. A loose connection here can prevent the humidifier from functioning correctly. Double-check all connections for tightness and proper insulation. This sequential connection – controller to valve to furnace – is critical for proper operation.
Power Source Considerations
Understanding the power requirements for your Aprilaire 4655 humidistat is paramount before beginning any wiring. Typically‚ these units operate on a low-voltage system‚ often utilizing 24 volts AC. This power is not directly from a standard 120V household outlet. Instead‚ it’s sourced from your furnace’s control board‚ which provides the necessary voltage for the humidistat to function.
Verify that your furnace control board can supply the required 24VAC. Incorrect voltage can damage the humidistat or prevent it from operating. The wiring for power usually involves a connection to the furnace’s ‘C’ (common) terminal and another to the ‘R’ (power) terminal. Always consult your furnace manual for specific wiring instructions and safety guidelines regarding low-voltage connections.
Voltage Requirements for Aprilaire 4655

The Aprilaire 4655 manual humidistat is specifically designed to operate on a 24VAC (Volts Alternating Current) low-voltage system. It does not connect directly to 120V household power. This lower voltage is supplied by your furnace’s control board‚ ensuring safe and efficient operation of the humidification system.
Confirming the correct voltage is critical; supplying higher voltage will likely cause immediate damage to the unit‚ while insufficient voltage will prevent it from functioning correctly. The ‘R’ wire typically carries the 24VAC power to the humidistat‚ while the ‘C’ wire serves as the common return. Always double-check your furnace’s documentation to verify these connections and ensure compatibility before proceeding with any wiring.
Step-by-Step Wiring Instructions
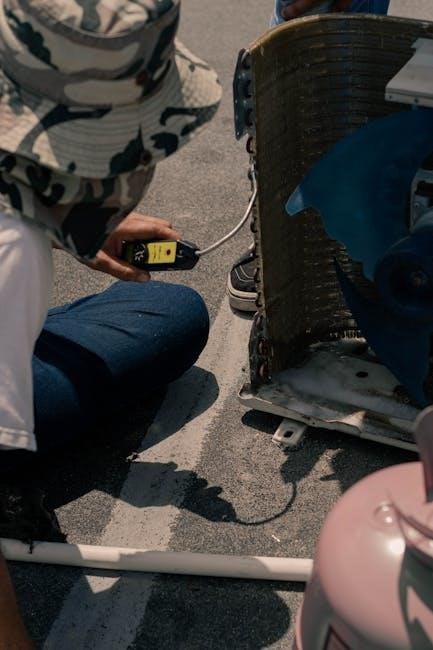
Before commencing any wiring‚ absolutely disconnect power to your furnace at the breaker box! Safety is paramount. Begin by identifying the existing wires connected to the old humidistat. Typically‚ you’ll encounter a white wire‚ a red wire‚ and potentially a common (C) wire.
The white wire is the primary connection‚ running from the Aprilaire 4655 to the solenoid valve (Aprilaire 4040) and then onward to the furnace. The red wire usually provides the 24VAC power. Carefully label each wire as you disconnect it to avoid confusion. Use appropriate wire connectors to securely join the wires‚ ensuring a tight and reliable connection. Refer to a wiring diagram for your specific setup to confirm correct placement.
Disconnecting Power Before Wiring
Prioritizing safety‚ the very first step in any Aprilaire 4655 wiring project is to completely disconnect power to your furnace. Locate the circuit breaker that controls your furnace and switch it to the “OFF” position. Double-check with a non-contact voltage tester to confirm that no electricity is flowing to the wires you’ll be working with.
This precaution is absolutely critical to prevent electrical shock and potential damage to the humidistat‚ furnace‚ or yourself. Even if you believe the power is already off‚ always verify it before touching any wires. Ignoring this step could lead to serious injury or even be fatal. Treat every wire as if it is live until proven otherwise with a reliable testing device.
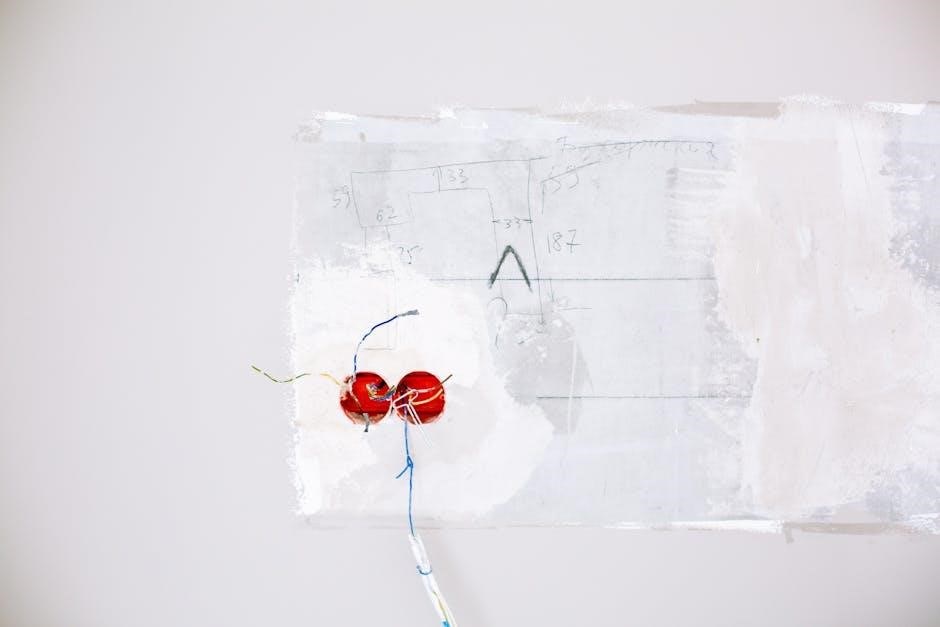
Connecting the White Wire – Detailed Procedure
The white wire is central to the Aprilaire 4655’s operation‚ linking the controller to the solenoid valve (typically a 4040 model) and ultimately to your furnace. Begin by connecting the white wire from the Aprilaire 4655 humidistat to the corresponding terminal on the solenoid valve. Ensure a secure connection using appropriate wire connectors – avoid simply twisting the wires together.
Next‚ run a wire from the solenoid valve to the designated terminal on your furnace’s control board. Again‚ use wire connectors for a reliable and safe connection. Double-check all connections to ensure they are tight and secure. A loose connection can cause intermittent operation or complete failure of the humidifier system. Proper connection of the white wire is vital for correct functionality.
Connecting Other Wires (If Applicable)
While the white wire is the primary connection for operation‚ some Aprilaire 4655 installations may involve additional wiring depending on the specific furnace and system configuration. Carefully examine your existing wiring and the Aprilaire 700M unit’s documentation for any other wires that need to be connected. These could include a common wire for power or wires for remote control functionality.
If additional wires are present‚ meticulously match them to their corresponding terminals on both the humidistat and the furnace control board. Always refer to a wiring diagram to ensure correct connections. Incorrect wiring can damage the system or prevent it from functioning properly. Secure all connections with appropriate wire connectors‚ and double-check for tightness and proper insulation.
Troubleshooting Common Wiring Issues
Several issues can arise during or after wiring an Aprilaire 4655 humidistat. A common problem is the humidistat failing to power on‚ often due to a loose connection or incorrect voltage. If the humidifier isn’t activating‚ verify the white wire connection to the solenoid valve and furnace‚ ensuring it’s secure and receiving power.
Incorrect humidity readings can indicate a faulty humidistat or improper calibration. Double-check all wiring connections and consult the manual for calibration instructions. When replacing a unit‚ simply following old wiring isn’t always reliable; verify against current diagrams. If problems persist‚ consult online forums like Appliantology.org or DoItYourself.com for community support and potential solutions.
Humidistat Not Powering On
If your Aprilaire 4655 humidistat isn’t powering on‚ the first step is to meticulously check the power source. Ensure the furnace is receiving adequate voltage and that the humidistat is correctly connected to it. A loose wire connection is a frequent culprit‚ so carefully inspect all wiring‚ particularly at the terminals. Verify the voltage requirements – the Aprilaire 4655 needs the correct voltage to operate.
Confirm that the wiring hasn’t been damaged during installation. Use a multimeter to test for continuity and voltage at the humidistat terminals. If voltage is present but the unit remains off‚ the humidistat itself may be faulty and require replacement. Online resources‚ like appliance repair forums‚ can offer further diagnostic guidance.
Humidifier Not Activating
When the Aprilaire 4655 humidistat displays power but the humidifier isn’t activating‚ focus on the connection between the humidistat‚ the solenoid valve (typically an Aprilaire 4040)‚ and the furnace. The white wire is critical here – ensure it’s securely connected from the controller‚ through the solenoid valve‚ and finally to the furnace. A break in this connection is a common cause.
Verify the solenoid valve is functioning correctly; it might be defective. Use a multimeter to check for voltage reaching the solenoid valve when the humidistat calls for humidity. If voltage is present but the valve doesn’t open‚ replacement is likely needed. Consult online forums for troubleshooting tips and potential solutions specific to your setup.
Incorrect Humidity Readings
If your Aprilaire 4655 humidistat displays inaccurate humidity levels‚ the issue isn’t typically wiring-related‚ but rather sensor calibration or placement. However‚ ensure the wiring is secure‚ as loose connections can sometimes cause erratic behavior. Confirm the humidistat is positioned away from direct airflow from the furnace or return vents‚ as this can skew readings.
Consider the age of the humidity sensor; they can drift over time. While the 4655 doesn’t usually offer user calibration‚ some advanced models might. Explore online resources like Appliantology.org or DoItYourself.com forums for discussions on sensor accuracy and potential workarounds. If readings consistently deviate significantly‚ sensor replacement might be necessary for reliable humidity control.
Using the Old Wiring as a Guide
Employing the existing wiring as a reference point during Aprilaire 4655 installation seems logical‚ but caution is paramount. While it can offer a starting point‚ directly replicating the old wiring without verification is risky. Wiring standards and component configurations can change over time‚ potentially leading to malfunctions or even safety hazards.
The original installation might have contained errors‚ or the previous humidistat model could have different wiring requirements. Always cross-reference the existing wiring with a current wiring diagram specifically for the Aprilaire 4655 and 700M combination. Online forums like Appliantology.org and DoItYourself;com emphasize the importance of validating the old setup against official documentation before making any connections.
Potential Risks of Simply Following Old Wiring
Blindly replicating old wiring for your Aprilaire 4655 installation introduces several potential hazards. Incorrect connections can damage the new humidistat‚ the solenoid valve (Aprilaire 4040)‚ or even your furnace’s control system. A miswired setup might prevent the humidifier from functioning correctly‚ leading to inaccurate humidity levels and potential discomfort.
More seriously‚ faulty wiring poses a significant electrical shock risk. If wires are improperly connected or lack adequate insulation‚ it could create a dangerous situation. Furthermore‚ relying on outdated wiring ignores potential code updates or manufacturer revisions. Do not assume the previous installation was correct; always verify against current diagrams. Online communities consistently warn against this practice‚ stressing the need for a methodical and informed approach.
Verifying Old Wiring Against Current Diagrams
Before finalizing any connections‚ meticulously compare the existing wiring with the official Aprilaire 4655 wiring diagram. Pay close attention to the color coding – specifically‚ the white wire’s path from the controller to the solenoid valve (Aprilaire 4040) and then to the furnace. Discrepancies are red flags‚ indicating a potential issue that needs investigation.
Online forums‚ like Appliantology.org and DoItYourself.com‚ emphasize the importance of this verification step. Do not assume the previous installer followed best practices. Confirm that the voltage requirements are met and that all connections align with the manufacturer’s specifications. If you find inconsistencies‚ consult the official Aprilaire documentation or seek assistance from a qualified HVAC technician. A careful comparison ensures a safe and functional installation.
Safety Precautions During Installation
Prioritizing safety is paramount when working with electrical wiring. Always disconnect the power supply to both the furnace and the humidistat at the breaker box before commencing any wiring work. Electrical shock hazards are a serious concern‚ and proper grounding techniques are essential to mitigate risks. Ensure the system is completely de-energized before touching any wires.
Double-check that all connections are secure and insulated to prevent short circuits. If you are uncomfortable working with electricity‚ it’s best to consult a qualified HVAC professional. Never attempt to work on a live circuit. Proper grounding ensures a safe path for electrical current in case of a fault‚ protecting you and your home. Adhering to these precautions will help prevent accidents and ensure a safe installation.
Electrical Shock Hazards
Working with electrical components presents significant shock hazards if safety protocols aren’t strictly followed. The Aprilaire 4655 humidistat interacts with your furnace’s electrical system‚ potentially exposing you to dangerous voltages. Even with the main power switched off‚ residual electricity can sometimes remain in capacitors within the furnace or humidistat.
Never assume a wire is de-energized without verifying it with a multimeter. Contact with live wires can cause severe injury or even be fatal. Improper grounding dramatically increases the risk of shock. Always ensure a solid ground connection is established before beginning any wiring. If you notice any frayed wires or damaged insulation‚ immediately discontinue work and consult a qualified technician. Prioritize your safety above all else.
Proper Grounding Techniques
Establishing a secure ground connection is paramount when installing the Aprilaire 4655 humidistat. Grounding provides a safe path for electrical current in the event of a fault‚ minimizing the risk of shock. Typically‚ the humidistat and furnace are grounded through the building’s electrical system. Verify the furnace is properly grounded to a known good ground point – often a metal conduit or grounding screw.
Ensure the humidistat’s ground wire (usually bare copper or green) is securely connected to the furnace’s grounding system. Never rely on the electrical box alone for grounding. A loose or corroded ground connection can render the safety feature ineffective. Double-check all connections for tightness and conductivity. If unsure‚ consult a qualified electrician to confirm proper grounding procedures are followed.
Tools Required for Installation
Successfully wiring an Aprilaire 4655 humidistat demands having the correct tools readily available. Essential items include a set of wire strippers‚ capable of cleanly removing insulation without damaging the conductors. Assorted wire connectors (wire nuts or crimp connectors) are needed to create secure and insulated connections between wires. A selection of screwdrivers – both flathead and Phillips head – will be necessary for accessing and tightening terminal screws.
Furthermore‚ a multimeter is invaluable for verifying voltage and continuity‚ aiding in troubleshooting. Safety glasses are crucial for eye protection. A small flashlight can illuminate tight spaces. Having electrical tape on hand is useful for additional insulation. Consider a voltage tester to confirm power is off before working on the wiring. Proper tools ensure a safe and efficient installation process.
Wire Strippers and Connectors
Selecting the right wire strippers is paramount for clean‚ damage-free wiring of your Aprilaire 4655 humidistat. Look for strippers with adjustable settings to accommodate various wire gauges commonly found in HVAC systems – typically 18 to 22 AWG. Avoid nicking the wire strands during stripping‚ as this weakens the connection. Once stripped‚ secure connections are vital; therefore‚ choose appropriate wire connectors.
Wire nuts are a common choice‚ twisting onto the exposed wires to create a secure bond. Alternatively‚ crimp connectors‚ used with a crimping tool‚ offer a robust and reliable connection. Ensure connectors are sized correctly for the number and gauge of wires being joined. Properly installed connectors prevent loose wires and potential electrical hazards‚ guaranteeing a stable and safe humidistat operation.

Screwdrivers and Multimeter
Essential tools for Aprilaire 4655 wiring include a set of screwdrivers – both Phillips head and flathead – to access and secure wiring connections within the humidistat‚ solenoid valve‚ and furnace control panel. Having various sizes ensures a proper fit‚ preventing stripped screw heads. Beyond basic installation‚ a multimeter becomes invaluable for troubleshooting and verifying correct wiring.
A multimeter allows you to check for voltage presence‚ confirming power is reaching the humidistat and solenoid valve. It can also test wire continuity‚ identifying breaks or shorts in the wiring. Before working with any wires‚ use the multimeter to verify the power is OFF. Accurate readings from a multimeter provide confidence in your connections and help diagnose issues like a non-powering humidistat or a malfunctioning solenoid‚ ensuring a safe and functional system.
Resources for Additional Help
When tackling Aprilaire 4655 wiring‚ numerous online communities offer valuable support and expertise. Appliantology.org hosts a dedicated forum – a “Master Samurai Tech Appliance Repair Dojo” – where users discuss specific Aprilaire models‚ including the 4655 and 700M‚ sharing wiring diagrams and troubleshooting tips. This platform is excellent for detailed‚ appliance-focused assistance.
DoItYourself;com’s Community Forums provide another robust resource‚ featuring threads dedicated to humidifier wiring and furnace connections. Users frequently share experiences with similar installations‚ offering practical advice and solutions to common problems. While official Aprilaire documentation can be limited online‚ checking their website for downloadable manuals or FAQs is always recommended. These resources collectively offer a wealth of knowledge‚ empowering you to confidently complete your Aprilaire 4655 wiring project.
Appliantology.org Forums
Appliantology.org stands out as a premier online destination for detailed appliance repair assistance‚ particularly regarding Aprilaire systems. Their forums‚ often referred to as a “Master Samurai Tech Appliance Repair Dojo‚” boast a dedicated community actively discussing the Aprilaire 4655 humidistat and its compatibility with the 700M unit. Users frequently post questions‚ share wiring diagrams‚ and offer step-by-step guidance for installations and replacements.
The forum’s strength lies in its focused expertise; members often possess in-depth knowledge of Aprilaire products. A specific thread addresses the question of simply following old wiring during a 4655 replacement‚ highlighting potential risks and the importance of verifying connections against current diagrams. This resource provides a collaborative environment for troubleshooting and ensuring a correct‚ safe installation of your Aprilaire humidistat system‚ offering invaluable support for DIY enthusiasts.
DoItYourself.com Community Forums
DoItYourself.com provides a broad platform for home improvement discussions‚ including a dedicated section for HVAC and appliance-related inquiries. Within these forums‚ numerous threads address the wiring of humidifier controllers‚ specifically the Aprilaire 4655 model. Discussions center around the correct routing of wires from the controller to the solenoid valve – often the Aprilaire 4040 – and subsequently to the furnace.
A key takeaway from these forums is the consistent emphasis on the white wire’s path: from the Aprilaire 4655 controller‚ to the solenoid valve (4040)‚ and finally to the furnace. Members share practical advice and clarify common wiring configurations. The forum’s collaborative nature allows users to seek clarification‚ share experiences‚ and collectively troubleshoot wiring challenges‚ making it a valuable resource for those undertaking a DIY installation or replacement.
Aprilaire Official Documentation (If Available)
Locating official Aprilaire documentation for the 4655 humidistat is paramount for accurate wiring instructions. While direct links to comprehensive manuals can be elusive‚ Aprilaire’s website often hosts installation guides and technical specifications for their products. These resources‚ when available‚ provide the most reliable information regarding wiring schematics‚ voltage requirements‚ and safety precautions.
Official documentation typically details the specific connections between the humidistat‚ the solenoid valve (such as the 4040 model)‚ and the furnace. It clarifies the function of each wire – particularly the white wire – and outlines the correct sequence for establishing a secure and functional connection. Accessing these official resources minimizes the risk of incorrect wiring‚ ensuring optimal performance and preventing potential damage to the system. Always prioritize official documentation when available.